Hey there, and welcome back to the fourth article in our dungeon dive series on how to craft the ultimate set of dungeon terrain ending of course with a final tavern build… if you’re players make it out alive!
If you read the previous three articles then you have reached level three crafter status as you can now craft a killer set of dungeon tiles, walls, and all sorts of scatter terrain! If you haven’t read them yet make sure to check them out after this article. Assuming your players have made it to the final boss we now need to create its lair. This craft will make you dig deep into your fiendish mind to create whatever you want to throw at your players. If your final craft maintains its function as an exciting final encounter room with a few fun areas for your players to traverse you’re bound to get some high-tension moments with your friends, and maybe even a total party kill haha… just kidding about that last one.
The final encounter or boss battle is something that I think we all embrace and look forward to after completing the arduous task of making our way though any adventure. At times it represents the end of a quest that the entire party was set out to complete weeks, months, or even years ago. It’s at a time like this that a well thought out and exciting encounter room can really create long-lasting memories for all your players for years to come.
When I think of a final encounter, I think of multi-layered terrain, hazards, something to create a sense of urgency, and plenty of room to move around. You’re going to want to first start by considering how much room you have on your table, your storage space, and the ability to get more than one use out of the craft. After all, this one is going to take some time! In this article I’m going to use my Krampus Lair build from my YouTube channel that I made as part of a collaboration with The Dungeon Master from Dungeon Craft.
Krampus’ lair
This craft makes use of some more advanced aspects of crafting such as electrical components and a much larger resin pour than our previous underwater tiles. It’s all still achievable if you take it step by step. Also don’t forget, you can always modify any craft. If you don’t want to mess with electronics you can always use paint to create your lava effects and stay away from electronics and resin all together!
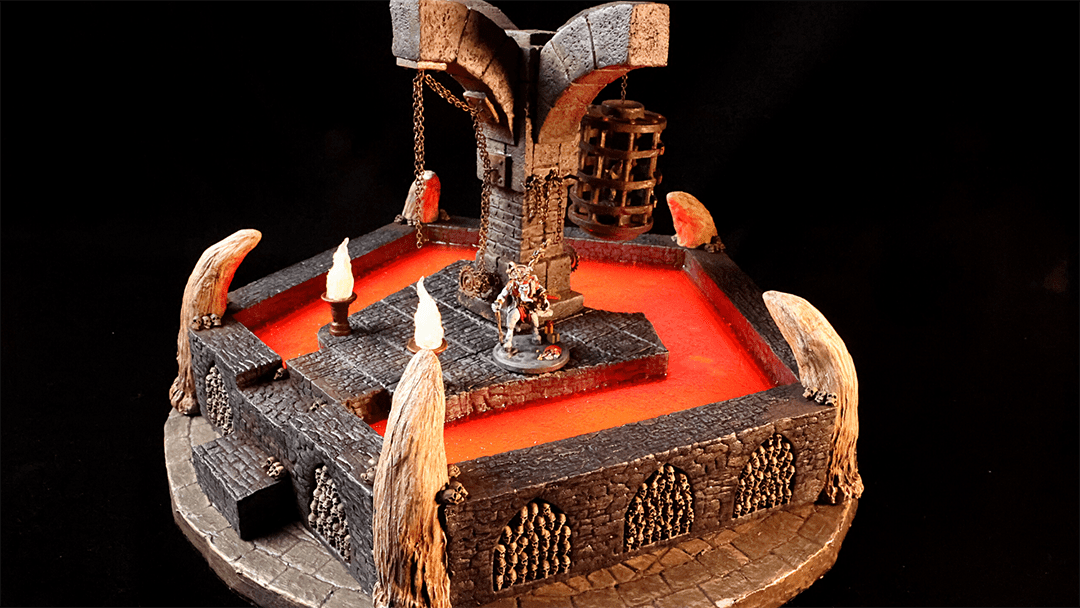
In this scenario Dan had sent me his Ultimate Dungeon Terrain (UDT) circular disk. It was a playable area of about sixteen inches in diameter. Dan was going to do a video on the history of Krampus and write up the encounter, and my job was to create the final room that had to fit within his UDT tile. I knew I could get multiple uses out of this piece of terrain as I could place it in the center of my sixteen, six by six cave tiles surrounded by the high walls I’ve already made! The trick was to make it fit on his smaller tile and still achieve the multi levels of play, hazards, urgency, and room to move about.
The design for Krampus’ Lair was going to take up most of Dan’s UDT tile but that’s ok because it still allowed for players to move about around the exterior of the lair and have a multi-level experience. Players could travel around the entire lair and attempt to scale the wall of over 500 skulls to get a view of Krampus. If you had a more conservative group, there was a nice set of steps leading to a bridge that took you over a pit of glowing lava to a platform where the final battle was to take place. There they could interact with the pillar and cage (more on that in just a minute) and Krampus. Alternatively, the players could move around the top of the outer wall as well keeping a distance from Krampus making use of ranged attacks but risking falling into the lava.
The hazard with this craft, and a big one I might add, was a glowing lava pit that encircled the lair. Dan wrote up a nasty outcome if you fall in, so I knew I wanted to push myself, and really make something special. I thought about this for a while, and knew I wanted to have the lava glow. It had to look alive! There was one person I wanted to reach out to and help me do a bit of brainstorming.
I called up Dafydd of Terrain Tronics (on YouTube) because I know he always gets excited when anyone wants to add lights, motors, or anything with power to their crafts. Dafydd is the creator of many different circuit boards that allow you to achieve so many cool effects with your crafts. I highly recommend checking out his channel and store online if you decide to get into this aspect of crafting. We decided to use a large strip of RGB lights cut up into strips of about four lights daisy chained together and placed under an acrylic sheet. The lights would then flicker randomly and at different colors based on the code Dafydd wrote to simulate bubbling flowing lava.
Once I had the lights in place, I then created a clear barrier over them using an eighth inch sheet of acrylic. Once I knew it was sealed properly, I then poured a batch of resin tinted orange over the acrylic sheet. That, coupled with an orange gel placed under the acrylic sheet, made the perfect looking lava flow! Now you’ll want to watch the video on YouTube to see all the intricacies of this build, but as I mentioned before you can achieve this effect simply by using paint! The right layering techniques of yellow, orange, maroon and black can be just as perilous looking on the table.
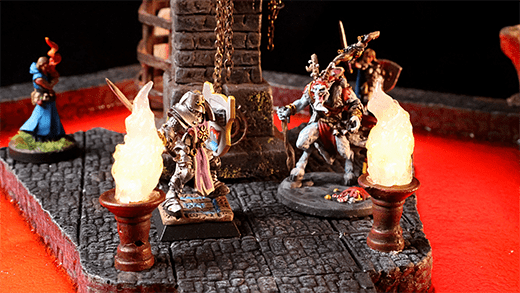
The braziers add to the fiery atmosphere
A fun way to make the lava flow would be to place hot glue around the moat then paint that up with the paints mentioned above for a quick lava effect. Now I love LEDs so to wrap up the lighting on this craft I also added two burning braziers on either side of the bridge. I simply created a flame out of melted hot glue and placed it over a flickering LED.
The wiring was run through a cast brazier I made from a Hirst Arts mold and connected to a Conway board. I know this might sound like a different language, but watch my “Easy LED Wiring” video, and you’ll see how you can wire up LEDs without even touching a soldering iron! Spoiler alert, I use a Conwy board that lets you adjust the brightness of up to 4 LED’s at once and is one of my favorite little boards when it comes to adding lights to all my crafts… thanks Terrain Tronics.
Finally, was the sense of urgency which isn’t mandatory, but always heightens the experience in my opinion. The sense of urgency in this build was a cage that dangles over the lava that is to be lowered down if the players can’t stop Krampus in time. I used a craft from a previous video, my “Pillar with Hanging Cage”.
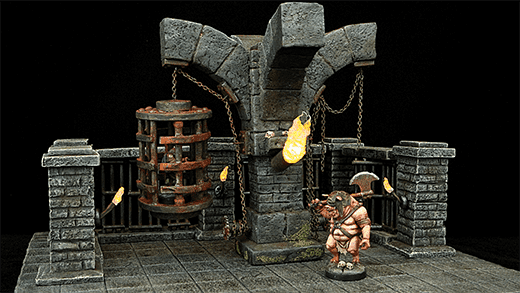
All dungeons need pillars, making them endlessly useful
Again this is where modularity wins. I was able to make use of an older build and combine it with a new one for a totally new craft. The idea of this craft originally was to create a pillar with arched top supports that would represent something you would see in a dungeon or torture chamber. A few of these arched pillars scattered about your game table really gives the illusions of that exact setting. To make this cage you’ll need some foam, bbq skewers, some metal washers to counterbalance the dangling cage, some small metal chain and that’s about it.
If you want to make the project easier, you’ll see I use 2” round miniature bases for the top and bottom of the cage along with some five minute epoxy to hold them together, but you can make all of this just out of foam. That’s the beauty of crafting. You can get creative with how you want to construct your crafts. As I mentioned in a previous article, when it comes to stone, nothing ages it and adds such a cool effect as pigment powder. I slapped a bunch of this on the craft where dust and debris would have accumulated.
When it came to my paint scheme for this craft I did opt to go for a dark looking stone. I wanted a way to add some color to this build so I decided I would add some moss around the base. To do this I added some War World Scenics Layering Spray, you can use Tacky Glue here as well, then place some dark green fine flocking. Once that cures, I’ll add some more layering spray and then a lighter color flocking to get a nice variation in color. You would be surprised what adding multiple layers of flocking will do in this scenario. With that we’ve completed our final boss lair!
Well, there it is, a complete dungeon experience. We’ve touched on many of the basics from cutting foam to advanced techniques such as using resin and LED’s. No matter how you choose to create your crafts, always try and push yourself to advance and learn something new. You can spend a long time adding new and exciting scatter terrain pieces to your dungeon as well as new encounter rooms for your players to experience. Over time you can create new and exciting tiles for other environments such as caves, sewer, water, desert and more! Well, our adventure is nearing its end, but not just yet!
Every great adventure ends in a tavern where our hero’s can rest up, make merry, and prepare for their next adventure. In our last installment I’m going to go over some advanced techniques and tools that can be used to create your very own tavern. The principles in that article will carry over to many different structural crafts you make down the road. I’ll touch on other topics such as special effects that can be added to them as well such as smoke machines. This will be an opportunity to add all sorts of fun details around the entire craft, so it is visually pleasing no matter what angle you approach it from.
For more great crafting inspiration and content please visit me on YouTube, Facebook, Instagram, Patreon at Tabletop WitchCRAFT, or visit my website that has links to the most common items I use, links to all my plans and merchandise, as well as discounts for all my affiliates. Ok, until next time I’ll see you around.
![Grim Hollow: The Player's Guide [PDF]](https://b2358178.smushcdn.com/2358178/wp-content/uploads/2021/02/Grim-Hollow-players-Guide-PDF-600x600.jpg?lossy=1&strip=1&webp=1)
0 Comments